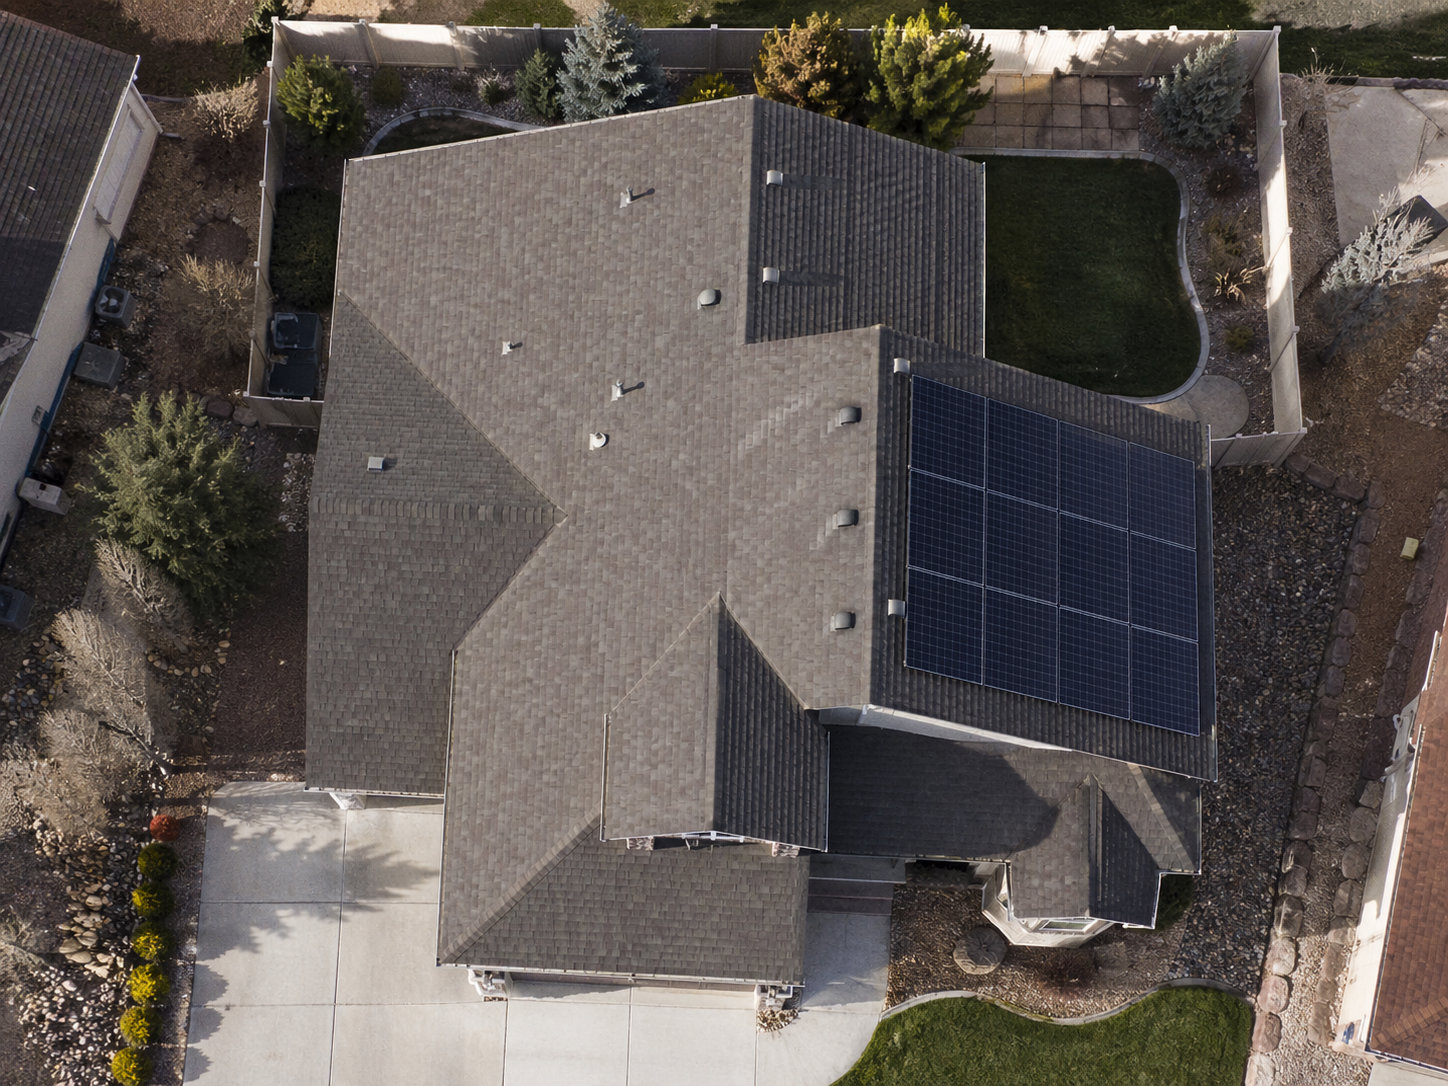
Do Solar Panels Damage Your Roof or Cause Leaks?
Quick Answer
Solar panels usually do not cause roof leaks on their own. The leak risk comes from the roof work around the solar system: mounts, flashing, fasteners, conduit penetrations, cracked tile, lifted shingles, or an older roof that was already close to failing. A practical repair benchmark for many roof leaks is about $400 to $2,500, but the bigger issue is access. If the leak is under the array, the panels may have to come off before the roof can be repaired correctly. So the real question is not “do solar panels leak?” It is “were the roof penetrations installed and waterproofed properly, and who is responsible if they were not?”
Why Solar Panels Get Blamed
Panels Are Not Usually the Leak Source
A solar panel is rarely the thing leaking. The panel sits above the roof. It does not normally touch the roof surface in a way that would let water inside the house.
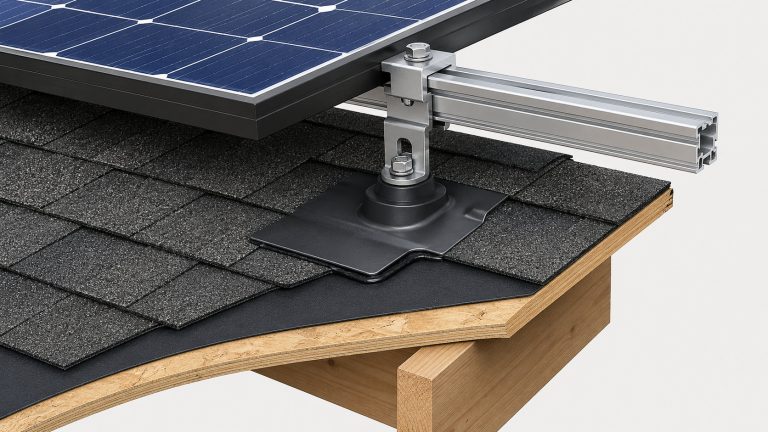
The risk is underneath the panel, where the racking system attaches to the roof. On many asphalt shingle roofs, those mounts are fastened through the roofing surface and into rafters or other approved structural points. That sounds risky, but roof penetrations are not unusual. Plumbing vents, exhaust vents, skylights, chimneys, and pipe boots all interrupt the roof surface too. The difference is whether the penetration is flashed correctly.
A drilled roof can stay dry for decades. A poorly flashed roof penetration can leak after the first hard rain.
The Penetration Matters Most
When a homeowner says, “the solar panels caused my roof leak,” the actual failure is usually more specific. It may be a lag bolt that missed framing. It may be flashing installed on top of shingles instead of integrated into the roof. It may be a cracked tile from foot traffic. It may be a conduit entry that was treated like an afterthought.
This is where problems usually start. The mount has two jobs. It has to hold the array, and it has to keep water out of the roof deck. If the mount is loose, poorly placed, or badly sealed, water can follow the fastener path into the roof assembly. From there, it may travel before it shows up indoors. The ceiling stain may not be directly under the bad hole.
Weak Roofs Can Hide Problems
Sometimes solar gets blamed because of timing. The roof was already weak, then solar was installed, then a leak appeared. That does not automatically mean the installer caused the roof to fail, but it also does not clear the installer.
Older shingles can crack when lifted. Tile can break under foot traffic. Old underlayment can be disturbed. Previous roof repairs may not tolerate new work nearby. In real-world inspections, the cause is often a combination: an aging roof plus a solar installation detail that made the weakness visible.
That is why a proper diagnosis matters. Guessing usually wastes money.
Good Flashing Controls Water
Good solar waterproofing is not just a bead of sealant. On asphalt shingle roofs, the flashing should work with the shingle layers so water runs over the flashing and keeps moving down the roof.
Sealant can be part of the detail, but it should not be the whole detail. Sealant ages. Flashing gives water a path. That difference matters.
Common Solar Leak Causes
Poor Mount Flashing
Poor flashing is one of the most common roof-related solar problems. The flashing may be the wrong size, installed too high or too low, left sitting on top of the shingles, or matched poorly to the roof material.

Roofs shed water in layers. Water moves across shingle laps, around nail lines, through valleys, and around small changes in slope. A solar mount interrupts that system. If the flashing does not redirect water correctly, the mount becomes a leak path.
Fresh caulk can make bad work look acceptable for a while. Weather tells the truth later.
Missed or Bad Lag Bolts
Lag bolts should land where the mounting system requires them to land, usually into rafters or approved structural members. If the installer misses the rafter and leaves an extra hole, the roof now has a weak point.
Fastener quality matters too. A bolt that is overdriven can distort the flashing or gasket. A bolt that is underdriven may not compress the sealing components. An angled or oversized pilot hole can also weaken the detail.
This is not only a leak concern. A mount that moves under wind load can stress the seal over time. Small movement around a roof penetration is bad news.
Sealant Used as the System
Sealant is useful. Sealant is not magic.
Caulk, mastic, and roofing sealants expand, shrink, dry out, collect dirt, and lose adhesion. If the waterproofing strategy is “we drilled the hole and covered it with sealant,” the roof is depending on the weakest part of the system.
A better installation uses the correct mount, correct fastener location, roof-specific flashing, and compatible sealant where the manufacturer calls for it. Sealant should support the flashing detail. It should not replace it.
In the field, I do not get nervous just because a solar system has roof penetrations. I get nervous when the installer cannot explain the flashing method. A properly flashed penetration is normal roofing work. A surface-caulked mount is a future service call.
Cracked Tile or Lifted Shingles
Tile roofs need careful handling. So do older asphalt roofs. Installers walking on tile can crack pieces without noticing. Shingles can tear when lifted for flashing, especially when they are brittle from age, heat, or previous repairs.
The leak may not start at the exact mount. A cracked tile can let water reach the underlayment. A torn shingle can let wind-driven rain get below the surface. Once panels and rails are installed, the damaged area may be hard to see.
That is one reason photo documentation matters before panels cover the work.
Wiring and Conduit Penetrations
Solar systems need wiring paths. That means conduit, roof entries, junction boxes, and sometimes additional penetrations. These need the same level of care as the structural mounts.
On metal roofs, placement is especially important. A screw or penetration in a low water-carrying channel can sit directly in the runoff path. The right detail depends on the roof profile. Standing seam, ribbed metal, exposed-fastener metal, and flat roofing do not get treated the same way.
Existing Roof Wear
Not every leak near solar is a solar leak. Old pipe boots, chimney flashing, skylights, valleys, vents, and past roof repairs still fail after solar is installed.
Water also travels. It can enter in one place, run along framing or decking, and appear indoors several feet away. That makes blame tricky. The answer is inspection, not assumption.
A solar installer knows the solar attachment points. A roofer knows water behavior and roof failure patterns. On a disputed leak, both may be needed.
How to Spot a Solar Leak
Leak Near a Mount or Rail
A leak is more suspicious when the stain, wet decking, or damp insulation lines up with solar mounts, rails, conduit entries, or junction boxes. That does not prove the solar installation caused the leak, but it tells the inspector where to start.
If the stain is below the array, the inspection should focus on mount penetrations, flashing laps, disturbed shingles, cracked tile, and conduit runs.
Stains Below the Array
Stains below the array deserve attention because the roof surface is partly hidden. From the ground, everything may look fine. The problem may be under a panel, behind a rail, or beneath a piece of flashing.
An attic inspection can help. Look for wet decking, rusted nail tips, dark staining, damp insulation, or moisture near mount lines. Do not touch solar wiring or equipment. The goal is to gather clues, not perform electrical work.
Leaks After First Heavy Rain
A leak that appears right after installation or after the first serious storm is more likely to involve installation workmanship. Wind-driven rain exposes weak flashing fast.
A leak that appears years later is less straightforward. It may still involve a solar mount, but roof age, sealant aging, storm movement, and unrelated roof components are also in play. The timing helps, but it does not settle the case by itself.
Attic Moisture Near Fasteners
Moisture near fasteners or penetration points is one of the better clues. If the roof deck is wet along a solar mount line, that area deserves close inspection.
Some homes make this difficult. Finished ceilings, low-slope roof assemblies, cathedral ceilings, and heavy insulation can hide the underside of the roof. In those cases, a contractor may need to inspect from above, and panel removal may eventually be required.
Leaks Away From the Array
If the stain is far from the solar array, slow down before blaming the panels. Vents, skylights, chimney flashing, plumbing boots, roof valleys, and old repairs are still common leak sources.
Map the interior stain to the roof layout. If the leak lines up with a vent stack or chimney, the solar array may be irrelevant. That distinction can save a homeowner from paying for the wrong service call.
| Symptom | Likely Cause | First Check | Who Usually Inspects |
|---|---|---|---|
| Stain below solar array | Mount flashing, fastener, or conduit issue | Attic moisture near mount lines | Solar installer and roofer |
| Leak after first heavy rain | Improper flashing or missed seal | Installation photos and roof penetration points | Original installer first |
| Stain far from array | Vent, chimney, skylight, or old roof failure | Roof features above stain | Roofer first |
| Recurring leak after patching | Hidden source under panels or poor repair access | Whether panels block the repair area | Both trades |
The practical takeaway is simple: location is a clue, not a verdict. A good leak diagnosis connects the ceiling stain, attic evidence, roof surface, solar penetrations, and recent weather.
Proper Solar Waterproofing
Flashing Under Roofing
On asphalt shingle roofs, flashing should usually be integrated into the shingle layers. The upper part of the flashing belongs under the course above it so water runs over the flashing, not underneath it.
That is the difference between waterproofing and decoration. A shiny metal plate sitting on top of shingles may look official, but if it does not control the water path, it is not doing the job.
Mounts Anchored Correctly
A solar mount is both a structural connection and a waterproofing detail. The installer should locate rafters or use an approved attachment method for the specific roof and racking system.
Bad anchoring creates two problems at once. The mount may not hold properly, and the roof hole may not seal properly. A fastener that misses framing can leave a penetration with poor compression and poor support.
Roof-Specific Waterproofing
Asphalt shingles, clay or concrete tile, metal roofing, and flat roofs need different details. A method that works on one roof can be wrong on another.
Tile roofs may need tile replacement, flashing, hooks, or standoffs designed for that system. Metal roofs may use clamps or profile-specific attachments. Flat roofs need membrane-compatible waterproofing and careful drainage planning. Treating every roof the same is a bad sign.
Photos Before Panels Cover Work
Once the panels are installed, the most important details are often hidden. Photos of the mounts, flashing, pilot holes, conduit entries, and roof condition before panel placement are useful later.
Photos do not prevent leaks by themselves. They prevent confusion. If a leak appears later, documentation helps show whether the mount was flashed correctly, whether the roof was damaged before installation, and where a contractor should inspect first.
Warranty Language That Covers Leaks
For roof leaks, the panel warranty is not the warranty that matters most. The workmanship warranty and roof penetration coverage matter more.
Read the contract. Look for how long roof penetrations are covered, what is excluded, who handles leak claims, and what happens if a roofer works around the array. Vague language is not your friend when water is coming through a ceiling.
What to Do After a Leak
Document the Leak
Start with proof. Take photos of the ceiling stain, wet attic areas, damp insulation, roof area, and solar array location if you can do it safely. Write down the date, time, rain conditions, and when you first noticed the leak.
This sounds basic, but it matters. Leak claims often turn into a responsibility dispute. Good documentation gives the installer, roofer, insurer, or warranty provider something concrete to review.
Check the Array Area
From the ground, look for obvious issues: lifted flashing, shifted shingles, cracked tile, loose conduit, rust marks, debris buildup, or gaps around mounts. Do not climb a wet or steep roof to inspect solar hardware.
If the attic is safe to access, look below the array area. Dark staining, wet decking, rusted nail tips, or damp insulation can help narrow the source. Avoid touching wiring, junction boxes, or solar equipment.
Contact the Installer First
If the leak is under or near the array, call the original solar installer first. They may have workmanship responsibility, roof penetration coverage, layout records, and installation photos.
This does not mean the installer is automatically at fault. It means they need to be involved before anyone disturbs the system. If another contractor removes panels or changes mounts first, the warranty conversation can get messy fast.
Bring in a Roofer
If the source is unclear, bring in a roofer. Roofers are better at tracing water paths, reading attic stains, and spotting unrelated failures around vents, chimneys, skylights, valleys, and roof edges.
The best diagnosis is specific. “Solar caused it” is not specific. “The flashing at the lower left mount is sitting on top of the shingle and water is tracking under it” is specific. Ask for photos and a written explanation.
Avoid DIY Solar Repairs
Do not remove panels, loosen rails, drill new holes, or smear caulk around mounts as a first move. Solar equipment can carry electrical risk, and disturbing the system can damage wiring or weaken a warranty claim.
Protect the interior if water is active. Put down towels, buckets, or plastic as needed. But leave the roof and solar repair to qualified trades.
- Photograph stains, attic moisture, and the roof area.
- Write down the rain event and when the leak started.
- Call the solar installer if the leak is under the array.
- Call a roofer if the source is unclear or away from solar mounts.
- Do not remove panels or apply caulk around mounts yourself.
Repair and Diagnosis Costs
Roof Leaks Often Run $400 to $2,500
A practical range for many minor-to-moderate roof leak repairs is about $400 to $2,500. Simple repairs may involve a small flashing correction, a few shingles, or a localized roof penetration. Larger repairs can involve decking, insulation, drywall, paint, or difficult access.
Solar changes the cost picture when the array blocks the repair area. The roof repair may be small, but getting to it may not be.
Solar Service Calls Can Add $400 to $1,000
A typical solar service or repair visit may fall around $400 to $1,000, depending on access, labor, warranty status, and what needs to be inspected or corrected.
Do not confuse a service call with a full repair. The solar contractor may confirm a mount issue, but a roofer may still be needed to repair damaged roofing materials. Or the roofer may find the leak first, then need the solar company to remove equipment for access.
Panel Removal Can Start Around $5,000
If the roof leak sits under the array, panel removal and reinstallation can become the expensive part. A practical residential benchmark often starts around $5,000, and some projects are priced around $250 to $350 per panel depending on system size, roof access, hardware, and local labor.
That is why small stains should not be ignored. A minor flashing defect is one problem. A minor flashing defect plus wet decking and interior damage is a much larger bill.
Flashing Fixes Beat Water Damage
Flashing materials are usually not the budget killer. Labor, access, diagnosis, panel removal, and water damage are what drive cost.
When comparing solar quotes, do not only compare panel brands and system size. Ask how the installer protects the roof. A lower-priced job that cuts corners at the roof penetrations can become expensive later.
| Scenario | Typical Cost Range | Main Cost Driver | Practical Note |
|---|---|---|---|
| Minor to moderate roof leak repair | $400 to $2,500 | Leak location, roofing material, damage extent | May be lower if access is simple |
| Solar service or repair visit | $400 to $1,000 | Labor, access, warranty status | Installer warranty may reduce homeowner cost |
| Panel removal and reinstallation | Often starts around $5,000 | System size, roof access, hardware condition | Needed when roof repair is blocked by array |
| Flashing correction | Varies by mount count and access | Number of mounts, roof type, labor | Cheaper before water damage spreads |
The main cost lesson is blunt: the leak is not always the expensive part. Access is. A leak under a solar array is harder to manage than the same leak on an open roof plane.
Who Is Responsible?
When the Installer Is Responsible
The solar installer is more likely responsible when the leak comes from a mount, flashing detail, conduit entry, junction box, or roof damage created during installation.
A leak that appears soon after installation and lines up with the array should be reviewed under workmanship or roof penetration coverage. The case is stronger when there are installation photos, clear warranty terms, and a documented leak location.
It gets harder when the roof was already old, brittle, poorly repaired, or undocumented before installation.
When the Roof May Be Responsible
The roof may be responsible when the leak comes from old vents, cracked pipe boots, worn chimney flashing, failing skylights, damaged shingles away from the array, or general roof deterioration.
This matters for buyers looking at a house with solar already installed. The presence of panels does not prove the roof is damaged. It also does not prove the roof is fine. The roof, attic, solar penetrations, and installation records should all be reviewed.
When Warranty or Insurance Applies
Coverage depends on the cause and the contract. A panel performance warranty is not a roof leak warranty. Workmanship coverage, roof penetration language, roofing warranty terms, and sometimes home insurance are the relevant areas.
Insurance may help with sudden covered water damage, depending on the policy. A workmanship warranty may help if the installation caused the leak. Either way, documentation matters more than opinion.
Avoid Blame Without Evidence
Homeowners often get stuck between the roofer and the solar company. The roofer says the panels caused it. The solar company says the roof was bad. Neither answer is useful without details.
Ask for photos, marked locations, and a written explanation. “It is near the solar” is weak. “Water is entering at the flashing below the second mount on the lower rail” is useful.
Prevent Leaks Before Solar
Inspect the Roof First
A roof inspection before solar is not busywork. It can identify brittle shingles, cracked tile, failing pipe boots, soft decking, old repairs, and weak areas that may not tolerate solar work well.
This does not mean every older roof must be replaced before solar. It means the condition should be known before the contract is signed. If the roof has weak areas, repair them first or document them clearly.
Ask About Flashing
Ask the installer what flashing method they use for your roof type. The answer should include how penetrations are flashed, how mounts are anchored, whether sealant is used, and how the crew handles your specific roof material.
“We seal every hole” is not a strong answer. You want to know how water is directed away from the penetration.
Require Installation Photos
Ask for photos of the roof before work, mount locations, flashing, conduit entries, and any damage found during installation. This is simple, and it can save arguments later.
Photos also help future roofers. If a leak appears five years later, the next contractor can see what was done under the array without guessing.
Confirm Roof Material Experience
Not every solar crew is equally good on every roof. Asphalt shingle work is different from tile. Standing-seam metal is different from exposed-fastener metal. Flat roofs need membrane-aware detailing.
Ask whether the installer has recent experience with your roof material. Ask what mounting hardware they use for it. If the crew treats every roof the same, take that seriously.
Review Leak Coverage
Read the workmanship warranty and roof penetration language before signing. Look for coverage length, exclusions, claim steps, and whether third-party roof work affects coverage.
This is the paperwork people skip. Then a ceiling stain shows up, and suddenly the skipped paragraph matters.
Risks and Mistakes
Assuming Solar Caused Everything
The first mistake is blaming every leak after solar on the panels. Sometimes that is true. Sometimes the leak is from a vent, skylight, chimney, valley, or old roof repair.
Chasing the wrong cause costs money. It can also let water damage spread while the real source goes untouched.
Accepting Sealant-Only Work
Sealant-only work can look clean on installation day. That is the trap. Sealant ages, cracks, separates, and fails.
The financial risk is bigger than the cost of resealing a mount. If water gets into the roof deck, insulation, ceiling, or walls, the repair can expand quickly. If panels have to be removed for access, the bill grows again.
Ignoring Small Stains
A small stain does not always mean a small leak. Water may travel through the roof assembly before it appears on drywall. By the time you see it, the roof may have been wet for a while.
If the stain is below a solar array, do not wait through another rainy season to “see what happens.” That kind of waiting often gets expensive.
Removing Panels Too Soon
Panel removal may be necessary, but it should be planned. Do not let someone start disconnecting or moving panels before the warranty position, leak location, and repair scope are understood.
If the original installer is not available, use a qualified solar service company. A roofer should not disconnect solar equipment unless they are properly qualified to do that work.
Expecting Easy Diagnosis
Some leaks are obvious. Plenty are not. Panels hide the roof surface. Water travels. Attics may be inaccessible. The stain may show up far from the entry point.
A careful diagnosis may involve interior inspection, exterior inspection, installation records, photos, and sometimes partial panel removal. That is not overkill. It is how you avoid fixing the wrong thing.
| Expectation | Reality | Best Move |
|---|---|---|
| The panel itself is leaking | The mount, flashing, or roof is usually the issue | Inspect penetrations and roof details |
| Caulk will stop it | Caulk may hide the source and fail again | Find the water path first |
| The roofer can fix around panels | Panels may block proper access | Coordinate solar removal if needed |
| The warranty automatically covers it | Coverage depends on cause and contract terms | Document before disturbing the system |
The realistic view is this: solar roof leaks are usually not mysterious, but they are often hidden. Treat the problem like a roof-system diagnosis, not a quick patch.
Pre-Solar Leak Checklist
Will Every Penetration Be Flashed?
Ask this directly. Do not settle for “we seal everything.” Ask what flashing method is used and how it works with your roof material.
Are Mounts Structurally Anchored?
Ask how the crew locates rafters or approved attachment points. Proper anchoring affects both the strength of the array and the quality of the waterproofing detail.
Will You Provide Photos?
Ask for photos before panels cover the mounts. Good photos should show roof condition, mount placement, flashing, and penetrations.
Does the Warranty Cover Leaks?
Look for clear roof penetration or workmanship coverage. If the warranty does not mention leaks, ask for written clarification before the job starts.
Who Handles Leak Repairs?
Ask what happens if a leak appears under the array. The answer should explain who inspects it, who removes panels if needed, and how responsibility is determined.
- Ask for the exact flashing method for your roof type.
- Confirm the installer documents hidden roof work with photos.
- Read the workmanship warranty, not only the panel warranty.
- Ask who pays for panel removal if a covered leak occurs.
- Keep all roof and solar records together for future buyers or repairs.
FAQ
Do solar panels cause roof leaks?
Usually, no. The panels themselves are rarely the leak source. Solar-related leaks are more often tied to poor flashing, badly sealed penetrations, cracked roofing materials, conduit entries, or roof problems that were already developing.
Can solar panels worsen an old roof leak?
Yes. Solar installation can disturb brittle shingles, cracked tile, weak underlayment, or old repairs. The panels may not be the original cause, but the installation work can expose a roof that was already close to leaking.
Who should I call first?
If the leak is under or near the solar array, call the solar installer first and document everything before equipment is moved. If the leak is away from the array or the source is unclear, bring in a roofer as well.
Are solar roof penetrations safe?
Yes, when they are properly anchored, flashed, and sealed for the roof material. A roof penetration is not automatically a problem. A poorly detailed penetration is the problem.
Can solar be installed without drilling?
Sometimes. Standing-seam metal roofs may use clamps, and some flat roof systems may use ballast. Many residential shingle systems still use penetrations, which is why proper flashing and leak coverage matter.